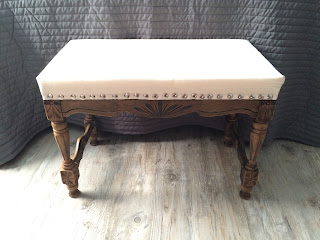
I have officially completed another DIY project! This one
I am so excited about because I have been wanting to tackle it for years. You
see, my mom and dad found this old bench at a barn sale and it was in our
garage for a long time just sitting there, unused. I knew I wanted it the
second I saw it, but with me still living at home, there wasn’t much space for
it in my bedroom.
To my joy, my mom decided she wasn’t going to repurpose
it herself and gave it to me a few weeks ago. And this week I finally decided
to stop letting it take up space in my trunk and restore it.
I’m a tad on the impatient side and don’t really know how
to take my time on things. If I can crank something out in a day, that’s what I
am going to do, but this bench was not going to let me do that.
That bench needed a lot of work. It smelled like an old
antique, musty and just plain gross. The former material was still attached
along the edges and it was covered in dust, dirt, and cobwebs. Definitely not
something I wanted to let sit in my house for too long untouched.
(Now, I am not by any means a professional at
restoring or repurposing so don’t quote my methods, I’m just going to share
what I did)
 The first thing I did was rinse the bench. I literally
laid it in the tub and ran water over it to get all of the gunk off. It
wreaked. After the water went from brown to clear again, I let it dry
overnight.Then I got to work yanking off the old fabric and the nails that held it down.
The following day I actually washed it. I took a rag,
some dawn, and put it back in the tub. I wanted to get rid of the stench. After
the soap was off of it, I poured some baking soda on it while it air dried in
an attempt to be sure the smell was gone.
While the bench was drying, I took the foam I bought from
Hobby Lobby and cut it to size. Since the measurements were awkward I had to
use 2 cushions and in order to keep them together, I hot glued them along the
edge.
I also was lucky enough to find the fabric and tacks I
used to upholster our headboard and was able to save money by just using that.
With the bench dried, I laid out the fabric and hot glued
the foam onto the bench. I didn’t expect it to hold long, I just didn’t want
the cushions to move while I was working on tacking the fabric.
 I cut the fabric to size and did one of the long sides
first, then flipped it and pulled the fabric tight to do the other long side.
To cap off the ends of the bench, I treated it like wrapping paper and just
made crisp edges.
The wood was easy for me to push the pins into by using
my hands, but once I had it all tacked down I went back around with a hammer to
make sure they were tight.
Now I have this adorable bench at the end of our bed.
Couple that with the curtains I hung over our window and our bedroom is already
starting to come together and feel like a cozy space.
Coming Tomorrow: I will share with you my first attempt at homemade ravioli! (fingers crossed it tastes great tonight!)
Coming Tomorrow: I will share with you my first attempt at homemade ravioli! (fingers crossed it tastes great tonight!)

No comments:
Post a Comment